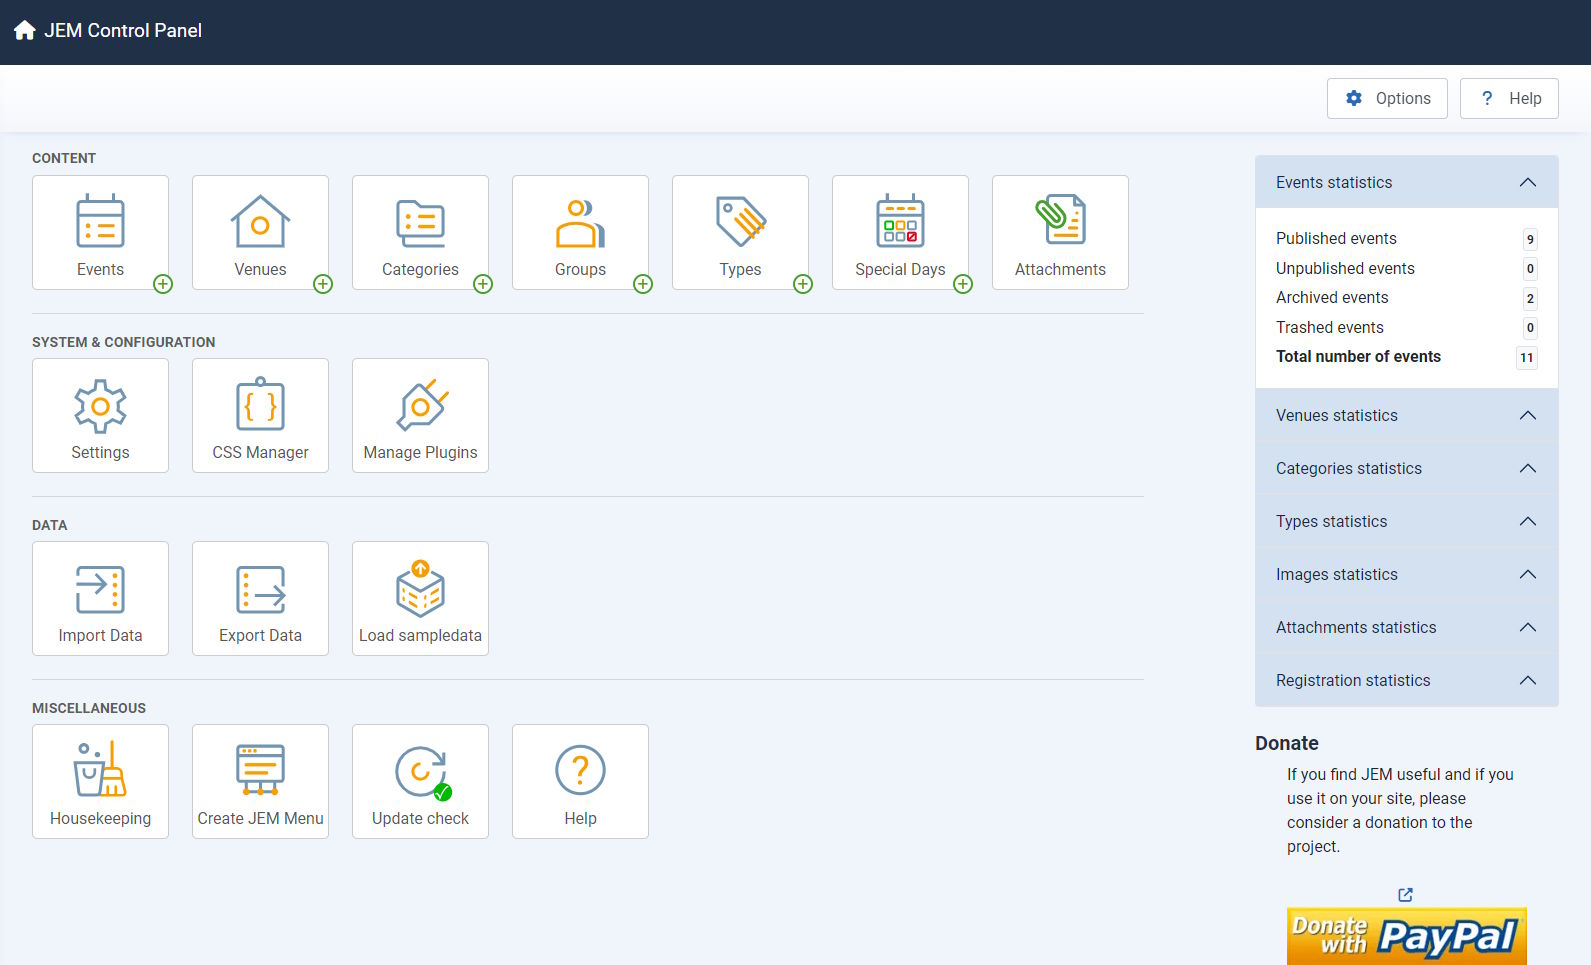
 JEM Control Panel. The available shortcuts and statistics depend on the current administrator's permissions.
The JEM Control Panel is the main administration dashboard for event content, configuration, data tools, maintenance and project information.
Open this screen: in the Joomla administrator, go to Components → JEM. The dashboard shows only the actions and statistics available to the current user.
Dashboard Structure
The left side contains grouped quick-access icons. The right side contains expandable statistics. Some content shortcuts include a small + badge that opens the corresponding creation form directly.
| Area | Purpose | Main shortcuts |
|---|
| Content |
Create and manage the records used by JEM. |
Events, Venues, Categories, Groups, Types, Special Days and Attachments. |
| System & Configuration |
Configure JEM and manage its presentation or integrations. |
Settings, CSS Manager and Manage Plugins. |
| Data |
Exchange and initialise JEM data. |
Import Data, Export Data and Load sampledata. |
| Miscellaneous |
Maintain JEM, create frontend navigation, check the installed version and open help. |
Housekeeping, Create JEM Menu, Update check and Help. |
| Statistics |
Review record counts and open filtered management lists. |
Events, venues, categories, types, images, attachments and registrations. |
Content Shortcuts
Click the main icon to open the manager. When the + badge is available, click it to create a new item without opening the list first.

Events
Create, edit, publish, archive, trash and filter events. Registration management is available according to permissions and event configuration.
Direct action: + Add Event

Venues
Maintain reusable locations, addresses, coordinates, timezones, images, access and publication state.
Direct action: + Add Venue

Categories
Organise events in a hierarchy with access rules, frontend navigation, colours and images.
Direct action: + Add Category

Groups
Manage JEM groups and their members for category-specific frontend submission and editing workflows.
Direct action: + Add Group

Types
Maintain reusable classifications assigned to events, venues or categories.
Direct action: + Add Type

Special Days
Define weekends, holidays, vacations and other day types that can mark calendar dates or block event scheduling.
Direct action: + Add Special Day

Attachments
Review files attached to events, venues, categories and other supported JEM records.
Files are managed from the attachment list or their owning item.
System & Configuration Shortcuts

Settings
Configures JEM behaviour, frontend output, event and venue pages, layouts, registration, permissions and component-wide defaults. This shortcut requires configuration permission.
Open Settings documentation

CSS Manager
Lists the editable JEM stylesheet files and opens the CSS editor. Back up custom changes and prefer template overrides or a documented custom stylesheet when practical.
Open CSS Manager documentation

Manage Plugins
Opens Joomla's plugin manager filtered for JEM-related plugins. Plugins must be enabled and configured before their integrations become active.
Open plugin-management documentation
Data Shortcuts

Import Data
Imports supported data into JEM. Review the file format, preview and validation results before committing an import.
Open Import Data documentation

Load sampledata
Installs the sample events, venues, categories and related examples supplied with JEM. Use it on a new or dedicated test installation before adding production content.
Open Sample Data documentation
Before data or maintenance operations: take a current database and file backup. Import, cleanup and sample-data actions can affect many records and are shown only to administrators with the required tools permission.
Miscellaneous Shortcuts

Housekeeping
Cleans unused images and relations, rebuilds thumbnails, removes orphaned attachment files and runs other maintenance operations. Review destructive actions carefully.
Open Housekeeping documentation

Create JEM Menu
Creates a Joomla frontend menu structure with links to common JEM views. Review the generated menu, access levels, publication state and aliases before exposing it to visitors.
Open Frontend documentation

Update check
Checks the installed JEM version against the available update information. The dashboard uses a different icon when it detects an available update.
Open Update check documentation

Help
Opens the JEM help and documentation interface. Help remains available even when the current administrator cannot access the other tools shortcuts.
Open Help documentation
Statistics Panel
The expandable panels on the right provide a quick health check of the JEM database. Most numeric badges are links that open the corresponding manager with a matching filter.
| Panel | Information shown | Typical use |
|---|
| Events |
Published, unpublished, archived, trashed and total events. |
Open the event manager already filtered to a publication state. |
| Venues |
Published, unpublished, archived, trashed and total venues. |
Find unpublished or trashed location records quickly. |
| Categories |
Published, unpublished, archived, trashed and total categories. |
Review the state of the category hierarchy. |
| Types |
Publication-state totals plus the number of event, category and venue types. |
Review classifications and open a manager filtered by entity. |
| Images |
Images assigned to events, venues, categories and types. |
Estimate image usage before cleanup or presentation changes. |
| Attachments |
Attachments belonging to events, venues, categories, other records and the total. |
Open the attachment manager filtered by owner type. |
| Registrations |
Attending users, booked places, waiting users and places, invited users, not-attending users and total registrations. |
Review registration workload and waiting-list activity. This panel requires attendee-management permission. |
Permissions and Visibility
The Control Panel is permission-aware. Different administrators may see different shortcuts, creation badges, statistics and toolbar actions.
- Event and venue managers require access to their corresponding JEM entity.
- The + badge for events or venues appears only when the administrator may create that entity.
- Settings requires Joomla component configuration permission.
- CSS Manager, Manage Plugins, import, export, housekeeping, sample data, frontend-menu creation and update tools require JEM tools-management permission.
- Registration statistics require attendee-management permission.
- Help remains available when restricted tool groups are hidden.
Toolbar
| Button | Purpose |
|---|
| Options |
Opens the Joomla component options and permissions for JEM. It is shown only to administrators with component configuration permission. |
| Help |
Opens the online documentation for the JEM Control Panel. |
Recommended First-Time Workflow
- For a test installation, load sample data before creating real content. Skip this step on a production site.
- Open Settings and review the general, layout, event, venue, registration and user-control defaults.
- Create the required categories and optional types.
- Create venues with consistent addresses, coordinates and timezones.
- Create events and review their publication, access, timezone, categories, venue and registration settings.
- Create or review the frontend menu and test every published JEM view.
- Return to the Control Panel to review statistics, update status and maintenance requirements.
Related Documentation